
Planning – Walls
![]() Switch to the Roomprocessing.
Switch to the Roomprocessing.
Select this symbol or click the right mouse button and select “room editor” (F2).
![]() Select ‘insert wall’.
Select ‘insert wall’.
Here you can see the Prombt bar and the dialogue for the different settings of the wall.
Possibility A: Create a wall with the mouse
With left click on the view you can set a starting point for the wall. Move the mouse to the desired point and click left again. You can fix as many points as you wish. Stop this process with ‘Esc’. Unless you select at least two corners, a wall cannot be built.
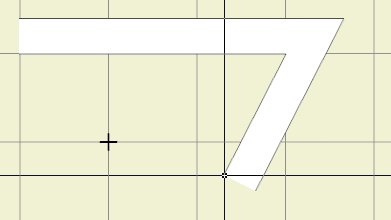
– Enter wall height, width left and width right into the menu
– Define the starting point of the wall by clicking on the work area with the left mouse key (check current cursor grid)
– Use the mouse or Prombt bar to define the length and direction of the wall
– Use the ESC key to finish creation
Possibility B: Create a wall with the ‘Promptbar’
Fill in the needed commands to insert a wall.
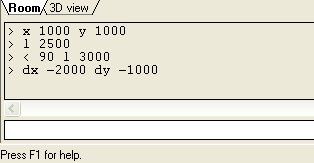
• l [space] length: creates a wall with a defined length beginning at the starting point or the last point in the mouse direction
• dx, dy: creates a wall at the starting point or last point in the x or y direction
• dx [space] positive value: creates the wall to the right
• dx [space] negative value: creates the wall to the left
• dy [space] positive value: creates the wall upwards
• dy [space] negative value: creates the wall downwards
Details about the wall
With the right mouse button you can open the dialogue for walls. Here you can change the dimension and the surface of the wall.